2024年11月23日 星期六

啟用 2FA ,使用 Oauth2 及 EF6 進行驗證設置


功能需求

  1. OAuth2 驗證
    使用 Bearer Token 作為身份驗證方式。

  2. 雙因素驗證 (2FA)
    用戶啟用 2FA 後,必須輸入 OTP(一次性密碼)以完成身份驗證。

  3. 數據存儲
    使用 EF6 操作用戶及其 2FA 狀態。


1. 準備環境

  1. 建立 ASP.NET Web API 專案

    • 選擇 .NET Framework 的 Web API 模板。
  2. 安裝 NuGet 套件

    • EntityFramework:數據庫 ORM。
    • Microsoft.Owin.Security.OAuth:支持 OAuth2 驗證。
    • OtpNet:生成和驗證 OTP。

2. 資料結構

用戶模型

csharp
using System.ComponentModel.DataAnnotations; public class User { [Key] public string UserId { get; set; } // 用戶唯一 ID [Required] public string PasswordHash { get; set; } // 密碼哈希 public string SecretKey { get; set; } // 2FA 密鑰 public bool TwoFactorEnabled { get; set; } // 是否啟用 2FA }

DbContext 類

csharp
using System.Data.Entity; public class TwoFactorDbContext : DbContext { public TwoFactorDbContext() : base("name=TwoFactorDb") // Web.config 中的連接字符串 { } public DbSet<User> Users { get; set; } // 用戶表 }

3. 配置 OAuth2 Bearer Token

Startup.cs

csharp
using Microsoft.Owin; using Microsoft.Owin.Security.OAuth; using Owin; using System; [assembly: OwinStartup(typeof(YourNamespace.Startup))] public class Startup { public void Configuration(IAppBuilder app) { var OAuthOptions = new OAuthAuthorizationServerOptions { AllowInsecureHttp = true, // 開發環境允許 HTTP(生產環境應使用 HTTPS) TokenEndpointPath = new PathString("/token"), // Token 發行端點 AccessTokenExpireTimeSpan = TimeSpan.FromMinutes(30), Provider = new OAuthProvider() // 自定義驗證邏輯 }; app.UseOAuthAuthorizationServer(OAuthOptions); app.UseOAuthBearerAuthentication(new OAuthBearerAuthenticationOptions()); } }

OAuthProvider

csharp
using Microsoft.Owin.Security; using Microsoft.Owin.Security.OAuth; using System.Linq; using System.Security.Claims; using System.Threading.Tasks; public class OAuthProvider : OAuthAuthorizationServerProvider { public override async Task ValidateClientAuthentication(OAuthValidateClientAuthenticationContext context) { context.Validated(); // 不進行客戶端驗證 } public override async Task GrantResourceOwnerCredentials(OAuthGrantResourceOwnerCredentialsContext context) { using (var dbContext = new TwoFactorDbContext()) { var user = dbContext.Users.SingleOrDefault(u => u.UserId == context.UserName); if (user == null || !VerifyPassword(user.PasswordHash, context.Password)) { context.SetError("invalid_grant", "The username or password is incorrect."); return; } // 檢查是否啟用了 2FA if (user.TwoFactorEnabled) { context.SetError("2fa_required", "Two-factor authentication is required."); context.Response.Headers.Add("X-2FA", new[] { "true" }); // 標記需要 2FA return; } var identity = new ClaimsIdentity(context.Options.AuthenticationType); identity.AddClaim(new Claim(ClaimTypes.Name, user.UserId)); context.Validated(new AuthenticationTicket(identity, new AuthenticationProperties())); } } private bool VerifyPassword(string storedPasswordHash, string inputPassword) { // 替換為你的密碼哈希驗證邏輯 return storedPasswordHash == inputPassword; // 示例,請勿直接使用明文驗證 } }

4. 2FA 流程

生成和驗證 OTP

使用 OtpNet 生成和驗證 OTP:

csharp
using OtpNet; public class TwoFactorService { // 生成隨機密鑰 public string GenerateSecretKey() { var key = KeyGeneration.GenerateRandomKey(20); return Base32Encoding.ToString(key); // 編碼為 Base32 格式 } // 生成 OTP public string GenerateOtp(string secretKey) { var totp = new Totp(Base32Encoding.ToBytes(secretKey)); return totp.ComputeTotp(); // 基於時間生成 OTP } // 驗證 OTP public bool ValidateOtp(string secretKey, string userInput) { var totp = new Totp(Base32Encoding.ToBytes(secretKey)); return totp.VerifyTotp(userInput, out _); // 驗證用戶輸入 } }

2FA API

用於驗證 OTP 並發放完整的 Bearer Token:

csharp
using System.Linq; using System.Web.Http; [RoutePrefix("api/twofactor")] public class TwoFactorController : ApiController { private readonly TwoFactorService _twoFactorService = new TwoFactorService(); [HttpPost] [Route("validate")] public IHttpActionResult ValidateTwoFactor([FromBody] TwoFactorRequest request) { using (var dbContext = new TwoFactorDbContext()) { var user = dbContext.Users.SingleOrDefault(u => u.UserId == request.UserId); if (user == null) { return BadRequest("User not found."); } if (!_twoFactorService.ValidateOtp(user.SecretKey, request.Otp)) { return BadRequest("Invalid OTP."); } // 發放完整的 Bearer Token var identity = new ClaimsIdentity(OAuthDefaults.AuthenticationType); identity.AddClaim(new Claim(ClaimTypes.Name, user.UserId)); var ticket = new AuthenticationTicket(identity, new AuthenticationProperties()); var accessToken = Startup.OAuthOptions.AccessTokenFormat.Protect(ticket); return Ok(new { AccessToken = accessToken }); } } } public class TwoFactorRequest { public string UserId { get; set; } public string Otp { get; set; } }

5. API 流程

  1. 獲取初步 Token:

    • URL: POST /token
    • 如果用戶啟用了 2FA,會返回 2fa_required 錯誤及 X-2FA 標頭。
  2. 驗證 OTP:

    • URL: POST /api/twofactor/validate
    • 提交 UserId 和 OTP,獲取完整的 Bearer Token。
  3. 使用 Token 訪問受保護的 API。


6. 改進建議

  1. 密碼哈希
    使用安全哈希(如 PBKDF2 或 BCrypt)存儲用戶密碼。

  2. HTTPS 強制
    生產環境中強制使用 HTTPS 確保數據傳輸安全。

  3. Token 有效期管理
    配置 Refresh Token 或縮短 Access Token 有效期以提升安全性。
2019年8月21日 星期三

2.x 升級 jquery 3.x 時發生TypeError: e.indexOf is not a function】

jquery 由 2.x 升級後 Load 的方式失效,有兩種解法如下

解法一:
    原始寫法:
   
 $("iframe").load(function () {...})


    需改寫成以下方式:
   
$("iframe").on('load', function () {...})


解法二:
    引入相容舊版的 jQuery Migrate
    jQuery Migrate是應用遷移輔助外掛,是用於高級版本兼容低級版本輔助外掛。
    例如jQuery版本用的是1.x,計劃升級到3.x,就可以在網頁刪除1.x版本,換成3.x版本,如果有指令碼錯誤,
    就引入jquery-migrate外掛用於兼容低版本,同時也顯示低版本方法替換成新版本方法的方案。
https://github.com/jquery/jquery-migrate/

2019年7月4日 星期四

Visual Studio 2015 使用 Python

在Visual Studio也可以正常執行 Python ,直接編譯
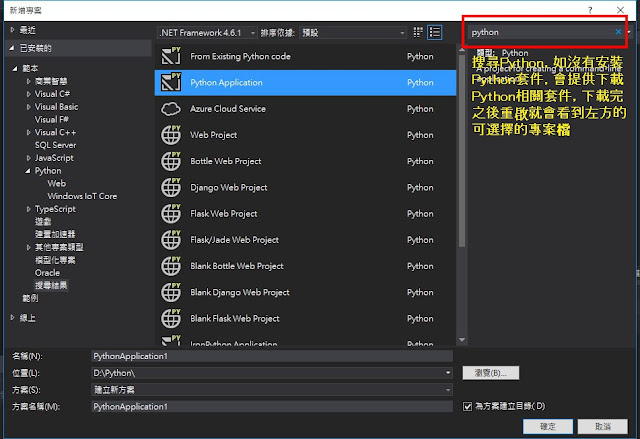
首先,新增一個專案,搜尋 Python,如沒有相關套件會提供安裝For Visual studio使用的套件


再來請選擇 Python Application建立新方案,在 PythonApplication1.py 上鍵入一行簡單執令:
print("test")
然後按 F5 進行執行

如沒設定過環境設定,會出現以下訊息,請點擊 Download and install Python連結下載及安裝完Pytohn執行環境

安裝完之後,此時執行還沒完成環境設置喔,請依下圖操作:
點擊 + Custom

設定如下,路徑請依安裝的版本進行修改,取得正確路徑,完成後按 Apply套用即可

完成以上項目,再按一下 F5 進行執行,即可發現可以輸出結果了,完成Python的環境設定就可以開始進行開發囉


2019年6月25日 星期二

Windows 10 關閉自動更新

首先在桌面同時按下 windows鍵+R鍵
叫出 執行 視窗 並輸入 “gpedit.msc” 按 確定
 視窗點擊 系統管理範本 → Windows 元件 → Windows Update → 設定自動更新

以上操作關閉 windows 10 的自動更新,讓它不要再無時無刻隨意更新了
另外 windows 10 家用版要啟用 gpedit.msc 需要執行以下的批次檔:
請將下面的文字存成  enableGpedit.bat ,然後使用系統管理身份執行它即可:


@echo off

pushd "%~dp0"


dir /b %SystemRoot%\servicing\Packages\Microsoft-Windows-GroupPolicy-ClientExtensions-Package~3*.mum >List.txt

dir /b %SystemRoot%\servicing\Packages\Microsoft-Windows-GroupPolicy-ClientTools-Package~3*.mum >>List.txt


for /f %%i in ('findstr /i . List.txt 2^>nul') do dism /online /norestart /add-package:"%SystemRoot%\servicing\Packages\%%i"


pause
 

酷意快速開發系統框架介紹

身為一個工程師
自覺重要的就是將經驗累積,整理
讓自己能多懶亦等於功力的增長

這段時間利用了一些時間,開發了一個平台,集成了一些常用的解決方式
諸如權限、人員、註冊管理
流程圖、各類圖表整合在一個平台裡
目的就是為了快速開發,解決問題
使用的技術也在展示平台裡介紹,沒有列出來的亦有 singler 的解決方案,WEB以及CLIENT的即時互通(傳訊或是警訊系統)
硬體以及人員的即時互動可以使用該技術作一個發展
還有定時執行工作的方案,使用 Quartz,這些沒有列在平台展示裡,但是本人已經實作過一段時間,可以提供一些項目處理出來。

所以如果您有想要合作,或是想發展的項目,可以與我進行連繫及討論喔:
平台展示: http://ourcoolidea.com

2017年9月4日 星期一

基金投資心得,請善用「基富通」平台

這些是我投資基金整理出來的心得,希望對大家有所幫助:
請使用基富通,因為大部分銀行購買基金,轉換都需要收取手續費,但基富通不收取轉換手續費(同基金公司),搭配基富通,且基富通打的折數更多,用它你的勝率一開始就贏了很多人


銀行手續費 1.5%上下,贖回有管理費,優點是有理專給你投資資訊(好像不是優點…),定期定額最低 3000-5000

基富通手續費  0.45 上下,贖回沒有費用,缺點是沒有理專,一切都要自己來,定期定額最低3000


以看我以下的心得,可以取得更大的勝率:

①請善用轉換的方式轉移資金或進行避險
避險就是覺得是走空或是國際情勢不明時,可能會照成手上的基金貶值,可以立馬轉入貨幣型的基金防禦
因為貨幣型的基金實穩,且年報酬率也約在1%左右(主要是資金的停泊站)
或是例如: 貝萊德美國政府房貸債卷基金 年配約3%
可以參考黑武士的低波動標地: https://goo.gl/ZmVgbR  低波動又能領息
且隨時又可將本金轉入其它覺得強勢的基金裡,不贖回節省手續費,永遠在基金市場裡玩轉,請搭配附件的圖表,大部分基金公司轉換「免手續費」

②不求永遠都是正報酬,投資各種標的分散風險,只要達成7成以上的勝率,總體來看就立於不敗之地
大家都知道蛋都丟同一個籃子的風險吧,當然風險越大,回報越大,但請你自問,你是個勝率100%的人嗎?

③大家都喜歡猜底,但永遠不知底是在哪裡,如有基金已經到達你覺得的底部,也不要一次大量投入
例如:這次打算投入10萬元,分成5天每天投入2萬,這樣子如果破底或反彈,都有分散風險
當然如果持續破底,那就可以暫時不投入,等待趨勢明確再來逐筆進入(這也就是不求最大報酬,但求勝率高的方式)
投資最悲慘的,莫過於難得一見的底部就在眼前,而你卻彈盡援絕(引用強基金版主的話)

④追高,強勢基金很明顯,其實在股市的也有這個投資方式,追高是短線最高累積報酬的方式,但是投資人都有一個預期心理,例如:如果我買了後馬上大跌呢?
導致每次看到強勢基金高高掛,每天都在破頂,但自己就是不敢下手去買
這個就是要把握紀律,如果你是高風險追求者,進場前請先定好停利或停損點,當然設定很容易,執行上真的很困難,別怕停利或保損,保持自己的本金(武器),市場上隨時都有機會

常會有人詢問,該買或該賣嗎
沒人可以決定你的資金去項,也沒有人可以100%預測未來走勢

所有的數據分析都是整理來跟目前市場大致方向,或許也常是落後資訊,要不要投資都是看你自己
給個看法參考,如果是逢底投資,全球資訊一展開,一定很多在低檔期的,而你為什麼要投資,投資後的趨勢跟自己原本規劃的是否有出入?
請多問問自己這句話,不要買個基金心理就常不上不下的
這樣子的心態跟賭博就沒兩樣,希望投資者都有自行判斷進出場的時間

⑤如果是要現金流的基友,購買債基,建議使用原幣購買,配回原幣可以自己控制匯率在哪個時間點轉換,台幣走強這段時間,配息被匯差吃掉了不少

⑥連結有一張EXCEL表,是組合算法,作好管理,計算你的目標年報酬率,讓數據量化,是你的開始走的第一步,記錄後過一段時間可以檢視,再調整,所以記錄是必要的。
連結:基金設定紀錄表

基金相關基礎推薦:  綠角


使用推薦連結開戶可以 取得一次下單免手續費的優惠,可以讓您贏在第一步
好的基金平台大家要支持,競爭越多受惠的就是消費者 希望大家投資順利

我的基富通推薦連結:https://goo.gl/c9YMRZ

推薦代碼:EDGJ1486

我非理專,專職也不是相關行業,無意幫任何平台打廣告,只是優惠告知,心得分享
想要自己檢視,自己成立一套紀律,累積財富


2017年6月5日 星期一

Xamarin Android C# WebView 實現 Alert Confirm 事件


一、 在 OnCreate 增加以下項目:


//允許使用 javascript
webView.Settings.JavaScriptEnabled = true; 
webView.SetWebChromeClient(new CustChromeWebViewClient(this));

二、Override alert confirm 事件:

        private class CustChromeWebViewClient : WebChromeClient
        {
            private Context _context;

            public CustChromeWebViewClient(Context father)
            {
                _context = father;

            }

            public override bool OnJsAlert(WebView view, string url, string message, JsResult result)
            {
                new AlertDialog.Builder(_context).SetTitle("提示訊息").SetMessage(message).SetPositiveButton("確定", delegate
                {
                    result.Confirm();
                }).Create().Show();


                return true;

            }

            public override bool OnJsConfirm(WebView view, string url, string message, JsResult result)
            {

                new AlertDialog.Builder(_context).SetTitle("提示訊息").SetMessage(message).SetPositiveButton("確定", delegate
                {
                    result.Confirm();
                }).SetNegativeButton("取消",delegate {
                    result.Cancel();
                })
                .Create().Show();


                return true;

            }

        }

三、 完成以上項目後,就可以測試WebView 上響應 Alert Confirm 事件